Are you looking for fun and engaging Halloween art activities or skeleton drawing lessons to bring spooky creativity into your classroom? Whether you’re facing the last-minute scramble for a quick sub plan, need a one-day lesson to keep your students focused, or you’re planning an in-depth project to help them explore new skills, I’ve got you covered!
As art teachers, we know it’s a challenge to balance creativity with curriculum objectives, especially around the holidays when energy is high. That’s why these Halloween-themed art activities are designed to inspire students while still teaching essential art skills. They’re flexible, easy to implement, and adaptable to different grade levels—making them the perfect fit for busy teachers who want to combine fun and learning during the spooky season.
Common Questions Teachers Ask About Halloween Art Activities and Lessons:
- What are the best Halloween art lessons for the classroom?
- How can I incorporate Halloween-themed art into a sub plan?
- What’s a creative Halloween project for high school art students?
- How can I teach reflective symmetry using a Halloween theme?
- What beginner-friendly Halloween art lessons can I try?
- How can I teach color theory and value with Halloween art?
If you’ve been wondering about any of these, you’re in the right place! I’ll break down a few of my favorite Halloween-themed art projects, highlighting how each lesson unfolds, the steps involved, and what your students will learn. Whether you’re looking for a short activity to fill a day or something more in-depth for your advanced classes, these projects are flexible enough to fit into your lesson plan—without requiring hours of prep time.
By the end of this post, you’ll have a solid lineup of Halloween art activities that are not only fun and creative but also aligned with important art skills like symmetry, value, and color theory. Ready to bring some spooky, artsy fun to your classroom? Let’s dive in!
1. Halloween Skeleton Drawing Lesson (Beginner-Friendly)

Looking for a skeleton drawing activity that’s perfect for middle school students or beginners? This lesson introduces foundational drawing techniques while giving students plenty of space to explore their own creative ideas while creating negative space drawings of a skeleton. It’s a flexible and engaging project that can be adapted to fit a single class or extended over multiple sessions, making it ideal for any classroom setting. Here’s a detailed look at how the lesson unfolds:
1. Start with Practice Worksheets Before Beginning Final Drawings of a Skeleton:

Before diving into their drawings of a skeleton, students begin with guided practice on worksheets designed to familiarize them with the basic structure and proportions of a skeleton. These worksheets offer simplified, step-by-step instructions to ease students into the process, giving them a solid foundation in drawing anatomy without the intimidation of freehand sketching. The practice phase encourages exploration and experimentation, allowing students to adjust proportions and shapes while gaining confidence in their skills.
2. Move to Good Paper:
Once students feel confident in their practice, they transition to higher-quality drawing paper to create their final drawings of a skeleton. At this stage, the focus shifts to more intentional drawing. Students begin to apply what they learned from the practice worksheets, but now they also need to think about composition: How will their skeleton fit on the page? Will it be upright, leaning, or in a more dynamic pose? This is where critical thinking and decision-making come into play, as students plan the layout of their skeleton and refine their drawing.
3. Creative Expression:

Now comes the fun part—after sketching the skeleton, students are encouraged to unleash their creativity by filling in the negative and positive spaces around their drawing. Here, they can really make the artwork their own by using a variety of techniques and styles. Whether it’s adding patterns, abstract shapes, or Halloween-inspired elements like bats, webs, or pumpkins, students are free to experiment. You can guide the materials they use in their skeleton drawing, such as limiting them to pencils and markers for a cleaner look, or you can offer more variety with watercolor, pastels, or crayons for added texture and depth.
How This Lesson Fits Into a Beginner Drawing Sequence
This negative space skeleton drawing works especially well when students are still building confidence and learning how to see before they’re expected to draw complex details. It’s often one of the first times beginners realize that drawing doesn’t have to start with perfect outlines to be successful.
After this lesson, students are more comfortable slowing down, checking proportions, and trusting a structured process. The X-grid feels supportive instead of restrictive, and students begin to understand how breaking an image down makes drawing feel possible.
That makes this project a natural bridge into more intentional line-drawing lessons, where students take what they’ve learned about observation and structure and apply it to more detailed work.
👉 If you’re looking for ideas on how to sequence beginner drawing lessons for middle school and high school, check out 3 No-Prep Beginner Drawing Lessons for Overwhelmed Middle & High School Art Teachers, where this project fits into a confidence-building, scaffolded progression.
Skills Demonstrated in Drawings of a Skeleton:
- Composition Skills: Deciding how to place the skeleton on the page teaches students how to work with composition. They’ll think critically about balance, space, and how the different parts of their drawing interact with each other, giving them a deeper understanding of how to structure visual art.
- Creative Problem-Solving: Filling in the negative and positive spaces encourages students to think creatively and make artistic choices about patterns, textures, and colors. They’ll also develop problem-solving skills as they figure out how to complete their drawing in a way that feels balanced and expressive.
- Flexible Mediums: This lesson can be adapted for different artistic mediums, giving students the opportunity to experiment with a range of materials in their drawings of a skeleton. Whether they stick to traditional pencil or venture into watercolor or pastels, they’ll gain experience in choosing and using different tools effectively.

Curious to learn more?
👉🏻Check out this skeleton drawing lesson!👈🏻
2. Reflective Symmetry Art – Halloween Edition (Quick One-Day Activity)

If you’re in need of a quick, no-prep Halloween art lesson that still packs an educational punch, this reflective symmetry project is the perfect fit. It’s especially useful as an emergency sub plan or a last-minute, one-day activity when you need to keep students engaged while teaching them essential art skills. With minimal prep and maximum creativity, this project is sure to captivate your class while giving you flexibility in how it’s executed.
1. Print & Go:

This lesson couldn’t be easier to set up—just print out the reflective symmetry worksheets and hand them out to your students. The worksheets feature Halloween-themed shapes (think bats, pumpkins, haunted houses, and more) that students will need to complete symmetrically. The design process is straightforward yet incredibly rewarding: students reflect half of the image onto the other side of the line of symmetry, creating a balanced and visually striking piece of art.
2. Extend the Activity:

While this reflective symmetry project works perfectly as a one-day activity, it can easily be expanded into a more detailed lesson. After students complete the basic symmetrical design, you can encourage them to take the artwork further by adding color, textures, or patterns. Challenge them to use Halloween-inspired hues like oranges, blacks, purples, and even eerie greens to give their artwork a festive flair. You can also introduce new techniques, like shading or cross-hatching, to give the symmetrical designs more depth and dimension.
What Students Learn:
- Reflective Symmetry and Spatial Awareness:
This lesson reinforces the concept of reflective symmetry, a fundamental principle in art and mathematics. Students learn how to accurately reflect shapes and balance them on either side of a central axis, sharpening their spatial reasoning skills. Understanding symmetry helps students recognize balance and harmony in artwork, which they can apply in future projects. - Attention to Detail:
Completing symmetrical designs requires precision and careful observation. Students must pay attention to proportions, spacing, and angles as they replicate the mirrored image, helping them develop a keen eye for detail. This process strengthens their ability to spot inaccuracies and make adjustments—a valuable skill not just in art but in many other areas of learning. - Creative Exploration Through Color and Patterns:
If you choose to extend the activity, students can experiment with colors, textures, and patterns, giving them a chance to personalize their artwork. Encouraging the use of Halloween-themed colors allows students to play with color theory and create designs that are both symmetrical and visually striking. Whether they choose to keep things simple with a black-and-white design or get elaborate with bold, spooky colors, this stage of the lesson nurtures their creative expression.

Curious to learn more?
👉🏻Check out this lesson!👈🏻
3. Acrylic Skull Painting Project (Advanced Art)

For high school art students ready to push their skills further, this acrylic skull painting project offers an in-depth exploration of advanced techniques. It’s perfect for students who are familiar with the basics and ready to dive into more complex concepts like value creation, shading, and color theory—all within the exciting context of Halloween. Not only does this project provide a creative outlet, but it also reinforces key artistic skills they’ll carry into future work.Step-by-Step Guide:
1. Sketch the Skull:

The project starts with students sketching a skull on canvas, with a strong focus on proportion and accuracy. This phase of the project is a great opportunity for students to practice observational drawing as they begin with drawings of a skeleton, a foundational skill for any artist. They’ll work on understanding the anatomy of the skull and translating what they observe onto the canvas, honing their ability to capture shapes and proportions correctly. This process builds confidence in their drawing skills, as they learn to pay attention to fine details and structure.
2. Build Value with Acrylics:

Once students have completed their skull sketch, they move on to painting, where they’ll focus on the intricate process of creating value. Using acrylic paints, students learn to build up layers to establish depth, gradually adding shadows and highlights to give the skull dimension. They practice blending techniques, learning how subtle transitions between dark and light areas create the illusion of form and three-dimensionality. This part of the lesson encourages patience and precision, as students discover how to manipulate light and dark to create a realistic or stylized effect.
3. Apply Color Theory:

One of the most exciting aspects of this project is the opportunity for students to experiment with color theory. Once the values are established, students can choose to stick with a monochromatic color scheme for a more traditional look, or they can explore contrasting hues to add drama and mood to their painting. By playing with complementary colors or analogous schemes, students get to see how color choices can influence the emotional tone of their artwork. Whether they opt for eerie greens and purples or stick to muted grays and blacks, they’ll discover how color transforms their piece.
What Students Learn:
- Creating Value with Acrylics:
Students learn how to build up layers of acrylic paint to create shadows and highlights, giving their artwork depth and a sense of realism. This skill is essential in painting, as it helps create the illusion of form and light within a flat, two-dimensional piece. - Color Theory in Action:
By experimenting with color schemes, students deepen their understanding of color theory. They learn how to apply colors thoughtfully to create mood, harmony, or contrast, all while developing their ability to make strategic artistic decisions. Whether they want a more traditional or experimental piece, the lesson provides space for both approaches. - Observational Drawing and Advanced Techniques:
Starting with an observational sketch and moving into advanced painting techniques, students refine their ability to draw what they see, while applying those observations into a fully realized painting. This step solidifies the importance of proportion, composition, and attention to detail, and helps students grow their overall technical skills.

Curious to learn more?
👉🏻Check out this lesson!👈🏻
4. Monster Mask Design Worksheets (Color Theory + Creative Choice)

Looking for a Halloween art activity that teaches real design skills and keeps students highly engaged? This Monster Mask Design lesson blends color theory, visual storytelling, and creative choice into one printable, easy-to-implement activity. It’s perfect for middle or high school students and works well as a no-prep sub plan, one-day lesson, or creative warm-up.
Students choose a vibe, plan a color scheme, and design their own monster mask using mix-and-match features like eyes, mouths, noses, and creepy decals, all while applying key art concepts like line, shape, texture, and color strategy.
Here’s how the lesson unfolds:
1. Plan with Purpose Using Vibe & Color Scheme Selectors

Before students even start drawing, they choose a monster archetype (Witch, Vampire, Werewolf, Zombie, or Creepy Clown) and commit to a color strategy like complementary, analogous, or monochromatic.
This step helps them think like designers, as they consider how mood and emotion are communicated visually. Are they creating a cute witch or a terrifying one? What color palette supports that feeling? It builds intention into their artwork from the very first step.
2. Build the Monster Using a Mix-and-Match Parts Menu
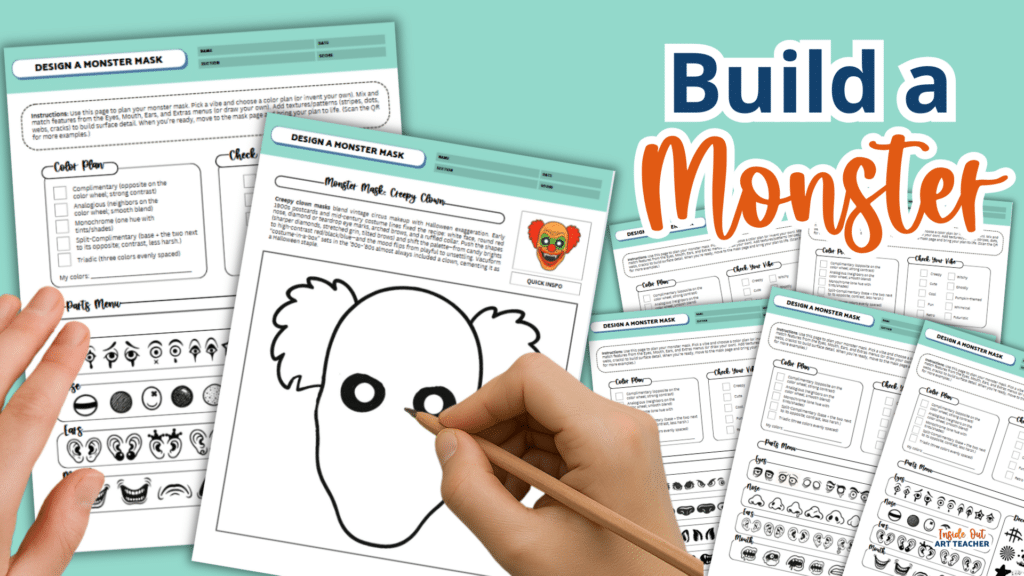
Next, students use a visual “parts menu” to design their mask. They can mix and match eyes, mouths, ears, noses, and decals (like moons, stitches, webs, drips) to build something unique — or they can invent features of their own.
This part of the project helps students engage in visual storytelling and reinforces the power of shape and line in building personality. It also helps students who struggle with drawing confidence by giving them strong visual references to build from.
3. Fill in with Texture, Detail, and Bold Color

Once the layout is planned, students move on to their large-format mask template, where they bring their design to life using texture, bold outlines, and carefully chosen color.
This phase is perfect for reinforcing line quality, contrast, and color theory. Whether you limit materials (like markers and pencils) or offer a range (watercolor, pastels), students can explore how color and detail create visual impact.
What Students Learn:
- Color Theory in Action: Students learn to apply complementary, analogous, monochromatic, split-complementary, or triadic schemes with intention, seeing immediate results in their final designs.
- Design Thinking & Mood: Choosing a vibe and designing to match it teaches students how to communicate emotion through visual choices (an essential real-world design skill).
- Creative Confidence: The mix of structure and choice allows every student to succeed. Strong artists can explore complex combinations, while hesitant students can follow guides for support.
- Elements of Art Reinforcement: Students work with line, shape, color, and texture in a focused way, strengthening foundational art concepts through fun and accessible design.
If you’re planning future lessons, this guide to seasonal art activities for middle and high school students includes projects for every time of year.

Curious to learn more?
👉🏻Check out this lesson!👈🏻
Inspiration for Your Halloween Art Lessons:
These Halloween art activities are designed to help you bring creativity and skill-building to your classroom. Whether you’re teaching beginners or advanced students, these activities cover a range of artistic techniques—from drawing and symmetry to painting and color theory.
Ready to get started? These lessons are not only fun but will have your students building skills they’ll use throughout the school year. Whether you’re looking for a quick one-day activity or a more in-depth project, there’s something here for every art class.

Happy Halloween and happy teaching! 🦇
Be the first to know about discounts, freebies, and new resources!
Find me on my blog – Inside Out Art Teacher, YouTube, or Instagram.