Neurographic art is a mindful drawing technique that turns simple lines into complex abstract designs. In this guide you’ll explore neurographic art variations, lesson ideas, and creative ways to use this relaxing drawing process in the classroom.
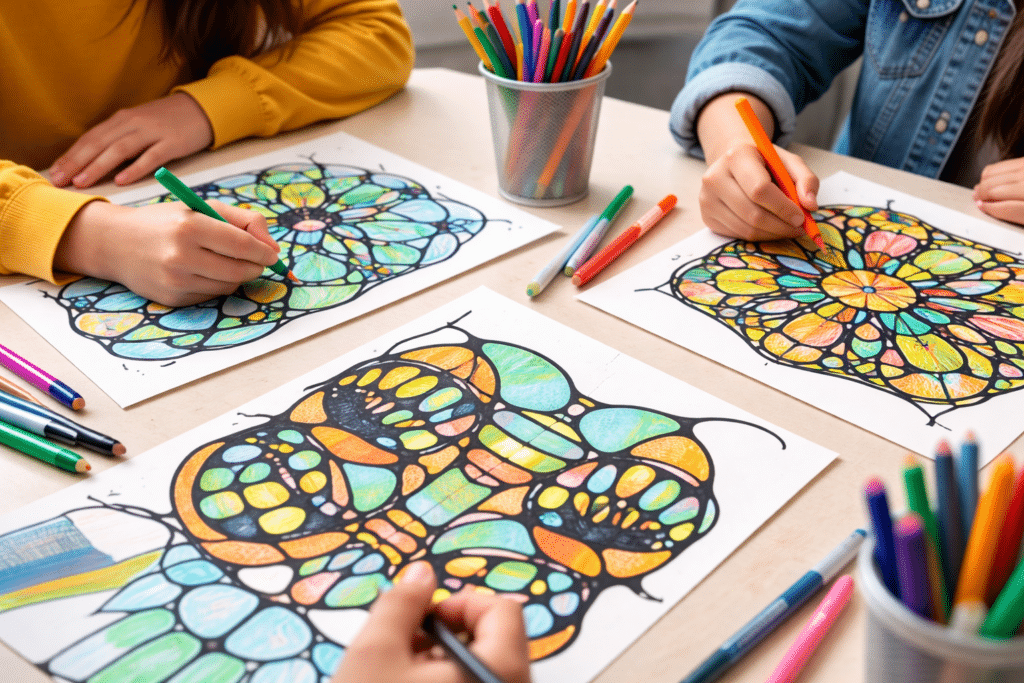
You know that moment when a classroom finally goes quiet — not because students are bored, but because they are completely absorbed in what they’re making.
Lines wander across the paper. Shapes begin to emerge where the lines cross. Students slow down, focus, and the energy in the room shifts.
Neurographic art has a way of doing that. The process is simple to begin, flexible for any skill level, and surprisingly calming for students who usually struggle to slow down and focus.
Because there are no mistakes and no pressure to draw something “perfect,” students relax and start exploring the lines and shapes that appear on the page.
Over the years I’ve used neurographic drawing in many different ways — as a mindfulness warm-up, a full art lesson, a composition exercise, and even a creative twist on typography and design projects.
This guide brings all of those ideas together in one place so you can explore neurographic art lessons, classroom strategies, and creative variations that actually work with real students.
Neurographic Art Lesson Ideas for Your Classroom
What Is Neurographic Art?
Neurographic art is a drawing technique built around flowing, organic lines that intersect across the page. As the lines cross, students round the corners where the shapes meet, creating smooth transitions between the forms.
The process often feels almost meditative. Instead of trying to draw something perfectly or realistically, students allow the lines to wander naturally and discover shapes as they emerge. This freedom makes neurographic drawing accessible to students at any skill level.
Because the process is forgiving and exploratory, it encourages students to slow down and focus. Many teachers find that neurographic drawing works beautifully as a mindfulness activity, helping students settle into the creative process before moving into more structured projects.
Why Students Respond So Well to Neurographic Drawing
One of the reasons neurographic drawing works so well in the classroom is that it removes the pressure students often feel when they think they have to “draw something correctly.” Instead of worrying about realism, students focus on the movement of lines and the shapes that emerge naturally as the drawing develops.
This shift from outcome to process helps many students relax and engage more fully in the creative experience. Students who usually feel unsure about their drawing ability quickly discover that they can create complex and interesting designs simply by following the lines across the page.
Over time, students begin to see how those flowing lines can become patterns, shapes, and structured designs. What begins as a calming drawing exercise often turns into a deeper exploration of composition, color, and visual organization.
Why Neurographic Art Works So Well as a Mindfulness Activity
Neurographic drawing naturally slows students down. Instead of focusing on getting something “right,” students follow the lines as they move across the page and respond to the shapes that appear.
This shift from outcome to process is powerful in the classroom. Students who normally rush through their work begin to slow down, while students who feel anxious about drawing realize there is no single correct result.
Many teachers use neurographic drawing as a short mindfulness activity at the beginning of class. The repetitive movement of drawing lines and rounding intersections helps students focus their attention and transition into a creative mindset.
Because the materials are simple — usually just paper and a pen or marker — the activity works well in almost any classroom setting.
A Simple 10-Minute Neurographic Mindfulness Activity
If you want to introduce neurographic drawing as a quick mindfulness activity, try this simple process:
Ask students to draw a slow wandering line across their paper.
Add several more lines that cross the first line.
Where the lines intersect, round the corners to soften the shapes.
Slowly fill spaces with patterns, color, or shading.
Within a few minutes the room usually becomes quiet as students focus on the evolving shapes in front of them.
Teaching Tip: Helping Students Get Comfortable with Neurographic Lines
When students begin drawing their first neurographic lines, I usually demonstrate the process with a thicker Sharpie rather than a very fine marker. The slightly thicker line gives students more control and helps them focus on the overall movement of the line instead of getting caught up in tiny details.
I also encourage students to start with just three or four large looping lines across the page. Too many lines at the beginning can quickly overwhelm the composition, so beginning with a few larger shapes helps students see how the design develops naturally.
As students draw, I remind them to follow the path of their lines across the page rather than jumping around randomly. Staying with the flow of the drawing helps the shapes connect in a more organic way.
One area where students sometimes need a quick demonstration is rounding the intersections where lines cross. Many students instinctively create sharp corners instead of the smooth “U-shaped” curves that give neurographic art its flowing appearance. When I see that happening, I usually gather a few students and demonstrate the curved transitions before they continue working.
Beginner-Friendly Neurographic Art Lessons
If you’re introducing neurographic drawing to students for the first time, these lessons are a great place to start. Each one explores the flowing lines and organic shapes that make neurographic art so engaging while keeping the process accessible for beginners.
This calming drawing activity introduces students to the basic idea of neurographic art while encouraging them to slow down and focus on the movement of the lines across the page.
This lesson blends neurographic drawing with foundational drawing skills. Students begin by using a simple X-grid structure to help them place shapes and forms accurately on the page before adding details.
Once the basic forms are established, students incorporate flowing neurographic lines to transform the drawing into a more expressive and abstract design. The project helps students see how structured drawing skills and creative line work can work together in the same piece.
In this lesson, students use neurographic lines to create bold abstract designs while experimenting with color, pattern, and composition.
Using Neurographic Art to Explore Design and Structure
Once students understand the basic neurographic drawing process, the technique can also be used to explore visual organization and design ideas. The flowing lines naturally divide the page into interesting shapes, which students can then develop with pattern, color, and more intentional design choices.
In this lesson, students use neurographic lines as the foundation for exploring composition and visual balance. As the shapes emerge across the page, they experiment with color, pattern, and contrast to develop a more intentional abstract design.
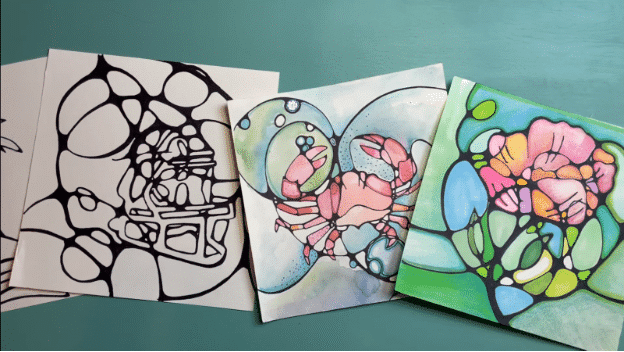
This project combines neurographic lines with observational drawing. Students draw crystal forms and then use flowing neurographic lines and patterns to transform the drawing into a vibrant abstract composition.
Creative Neurographic Art Variations
One of the most exciting things about neurographic drawing is how flexible the technique can be. Once students understand the flowing line process, it can be combined with many different themes, materials, and creative ideas.
These projects show how neurographic art can move beyond the basic exercise and become part of more imaginative classroom explorations.
If your students enjoy experimenting with expressive lines and abstract shapes, you can find more drawing ideas in my collection of beginner drawing lessons.
This playful project combines expressive neurographic line work with typography. Students create bold lettering and then use flowing lines and patterns to build energetic abstract designs around the text.
This lesson focuses on expressive line drawing while introducing students to the calming rhythm of neurographic-style lines. The simple step-by-step process helps students experiment with abstract shapes and patterns while building confidence with line work.
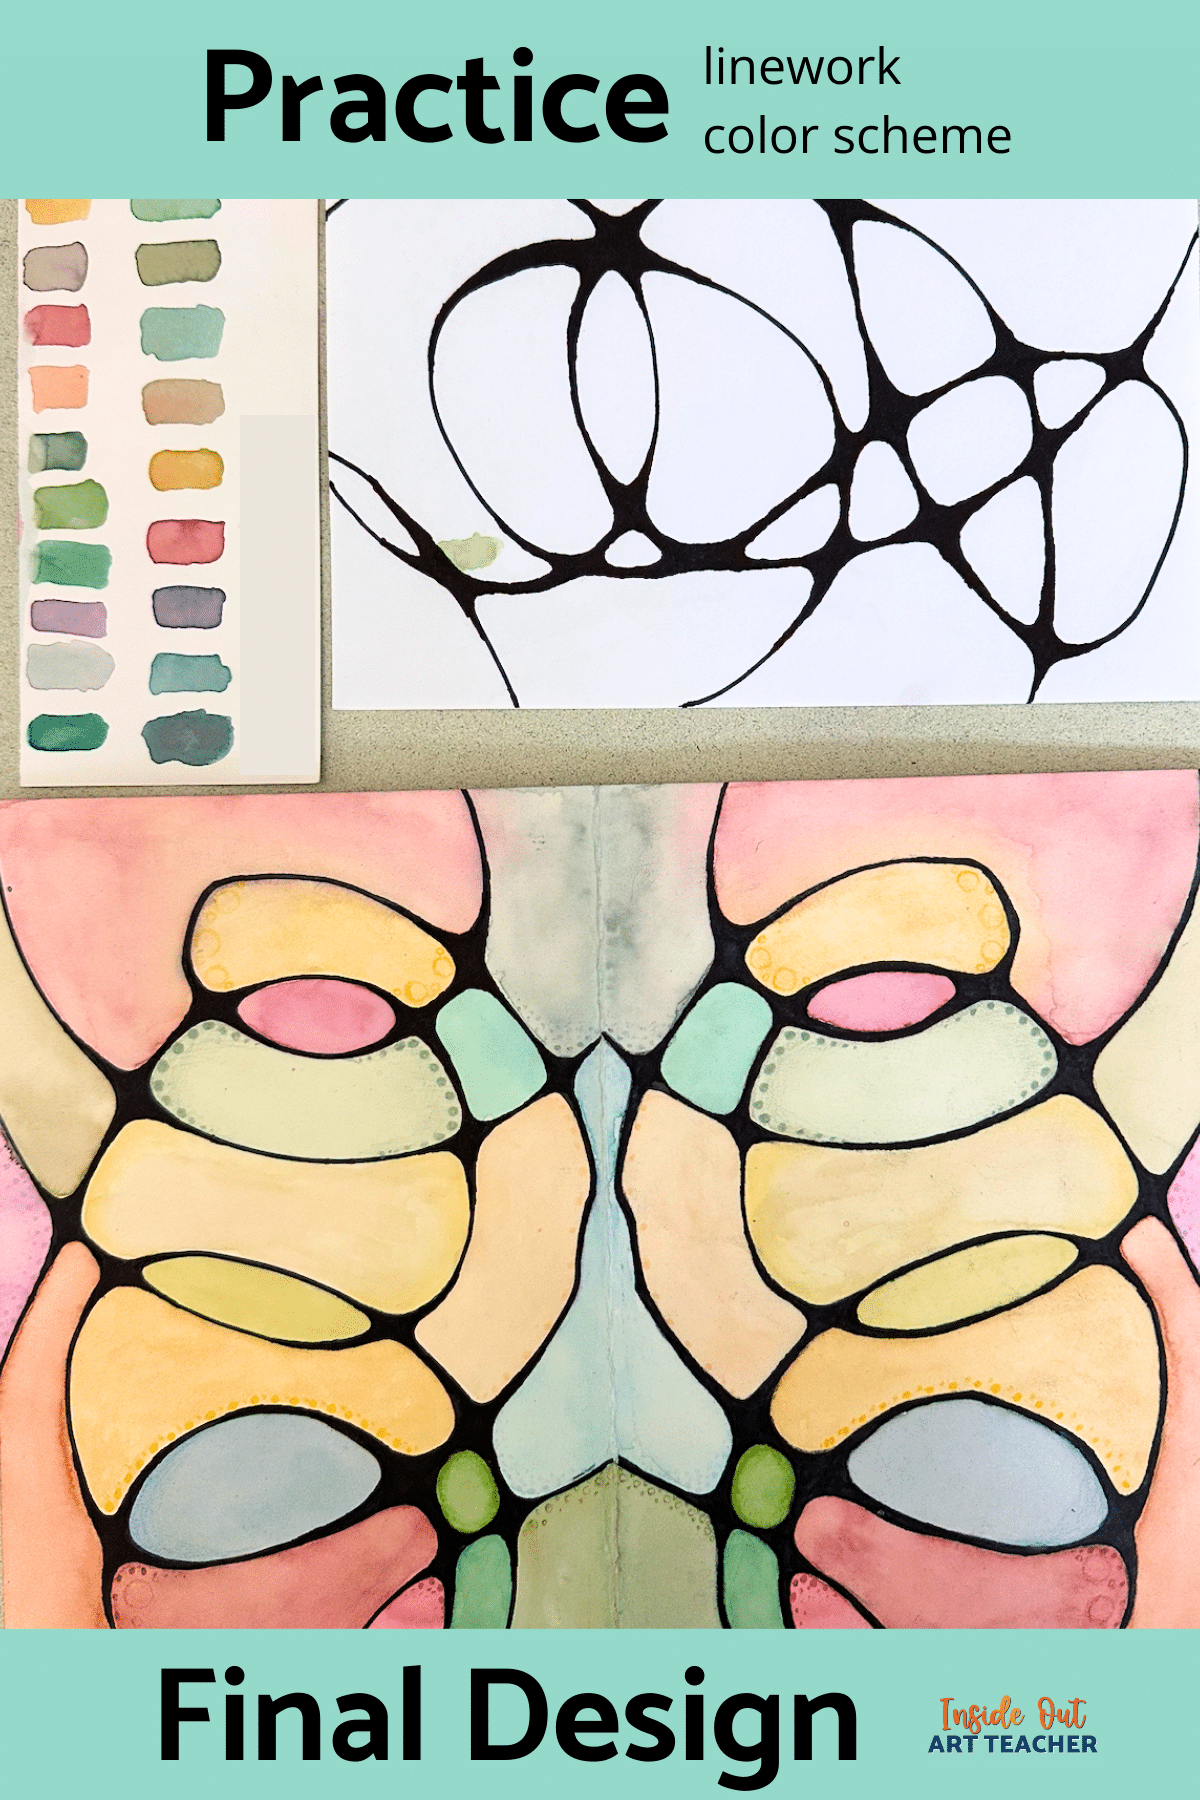
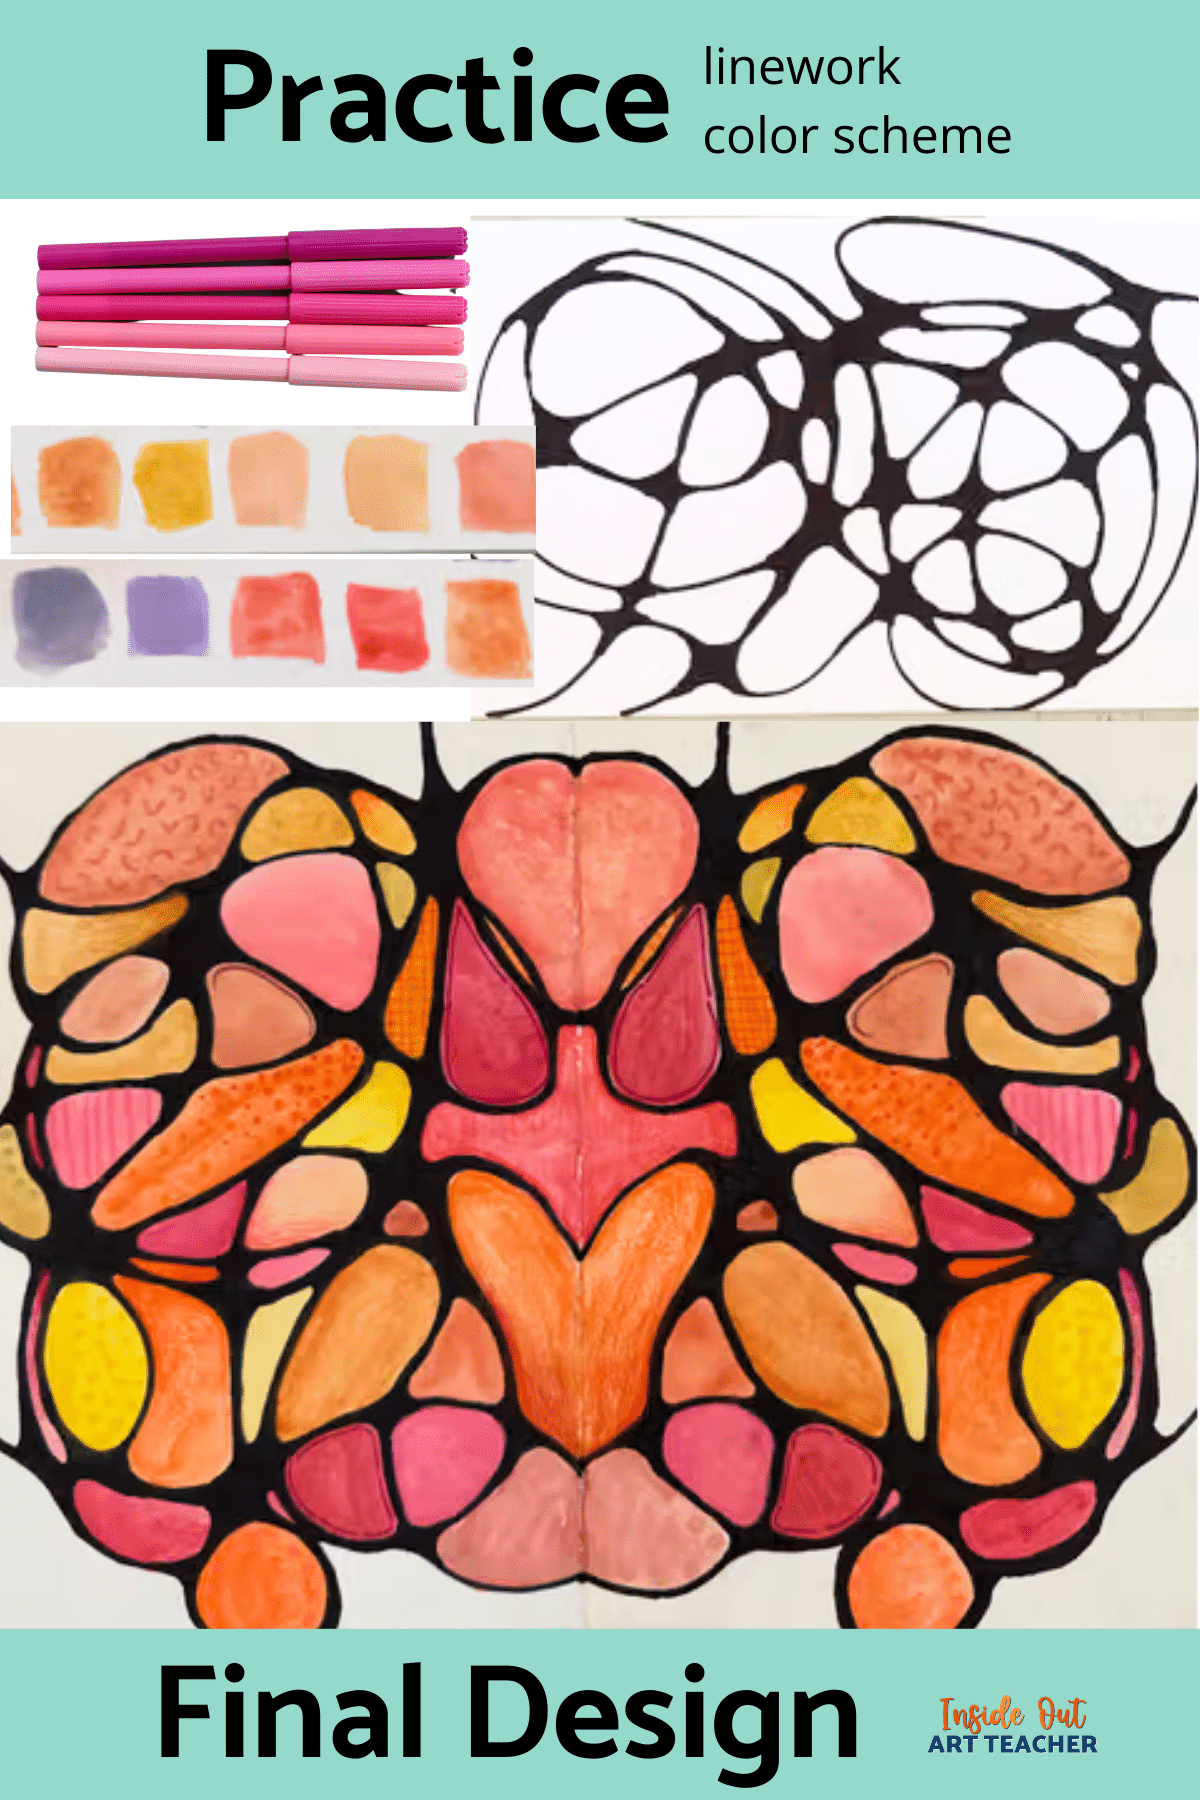
This abstract art lesson is one of my favorite ways to start the semester. Students explore reflective symmetry while creating bold abstract designs using flowing lines and expressive color choices.
Because the structure is simple and predictable, students experience an early success. They learn how symmetry can organize a design while still leaving plenty of room for creative decisions.
The lesson also introduces some basic color theory concepts. Students experiment with developing their own color palette and begin thinking about how color relationships can strengthen their design. Many students enjoy the process of selecting colors and building a palette that reflects their own style.
The combination of symmetry, expressive lines, and personal color choices makes this project a strong entry point for students who may feel unsure about their drawing skills.
Where Neurographic Art Fits in Your Art Curriculum
Neurographic drawing can be used in many different moments throughout the school year. Some teachers introduce it as a calming first-week activity to help students relax and experiment with expressive line work. Others use it as part of an abstract art unit or as a warm-up before more structured drawing projects.
Because the materials are simple and the process is flexible, neurographic art can easily connect to larger drawing lessons, design explorations, and even sketchbook activities.
Neurographic drawing can be a great first-week project because it removes pressure and encourages students to explore lines and shapes freely. Activities like this help set the tone for a classroom where creativity and experimentation are valued.
Because neurographic drawing focuses on line, shape, and pattern rather than realistic representation, it naturally connects to lessons about abstract art. Students begin to see how simple visual elements can create complex and expressive designs.
Many teachers introduce neurographic drawing alongside beginner drawing lessons because the flowing lines help students build confidence with mark-making before moving into more structured drawing techniques.
Want These Neurographic Lessons Organized and Ready to Teach?
Neurographic Art Lesson Bundle
If you want a grab-and-go option, my Neurographic Art Lesson Bundle brings multiple neurographic projects together so you can teach the technique as a short unit with built-in variety.
Neurographic art is one of my favorite ways to help students slow down, focus, and feel successful with drawing — especially when the class needs a calm creative reset. If you try one of the lessons above, I’d love for you to come back and explore a new variation as your students’ confidence grows.